
Cirros Ricoh Installer: operator guide
Provisioning Ricoh IM-series MFDs with the Cirros app suite
v1.7 Public
What this tool does. The Cirros Ricoh Installer is a self-contained bench tool that installs and configures the Cirros application suite on Ricoh IM-series multifunction devices — removing the old print-management system, installing the Cirros apps, setting SDK certification, authentication, print-volume tracking, card readers and device settings — from one screen, per device or across a fleet.
Overview
The installer runs entirely on the technician’s PC. It bundles its own Java runtime, so nothing needs installing — you extract the ZIP and double-click the program. It opens a small service and your web browser, and everything is done in the browser.
- Per device or bulk — provision one MFD or a whole site in one run.
- Full provisioning — removes competitor apps, installs the 5 Cirros apps, sets the SDK-certification service modes, enables Custom authentication, configures the card reader, and applies the agreed settings.
- On-site & offline — runs next to the devices; nothing is sent to the cloud during a run.
The six pages
| Page | What it’s for |
|---|---|
| Updates | The working screen — devices needing action, with KPI cards and the device table (Device / Location / Installed / Available / Status / Action), plus Add devices, Check for updates and Install all. |
| Devices | The same table showing the full inventory, not just items needing action. |
| Packages | Where the Cirros app packages come from (ownCloud source + Sync now / Load bundled suite) and the five-app suite with versions. |
| History | Per-action audit log (Time / Operator / Action / Device / Result) — what your sign-in name feeds. |
| Reports | One card per bulk run (failures first), with per-device reasons + fixes, CSV export and Retry failed. |
| Settings | The deployment profile: apps to remove, ownCloud sources, card reader, device settings applied during install, and Support (Download logs). |
Before you start
| Requirement | Detail |
|---|---|
| A Windows PC | On the same network as the Ricoh devices you’re provisioning. |
| Network reach to each device | The PC must reach the device on TCP 443 and 80 (Web Image Monitor) — all provisioning goes over these web ports. (The legacy SDK port 8080 is normally closed on IM-series devices and is not needed — a closed 8080 is not a fault.) Printers are often on a separate VLAN — see the warning below. |
| Device credentials | The MFD’s Web Image Monitor admin username & password, and the SDK / remote password (usually ricoh). |
| Extract location | A normal folder such as the Desktop or Downloads — not Program Files (Windows blocks writes there). |
The #1 cause of “Device not reachable”. Client networks frequently put printers on a segmented VLAN that the technician’s laptop can’t reach. Before you start, confirm the path from PowerShell: Test-NetConnection <device-ip> -Port 443. If it fails, run the installer from a machine that can reach the printer network.
Test-NetConnection <device-ip> -Port 443Launching the tool
- Extract the ZIP (e.g.
Cirros Ricoh Installer 1.7 Public.zip) to a normal folder. - Double-click
CirrosRicohInstaller.exe. - A small console window opens and your default browser opens at
http://localhost:8777/. - Keep the console window open while you work — closing it stops the installer.
The console shows technical text — that’s normal. It’s the service log. You don’t need to read it. If the browser doesn’t open on its own, open one manually and go to http://localhost:8777/.
Signing in
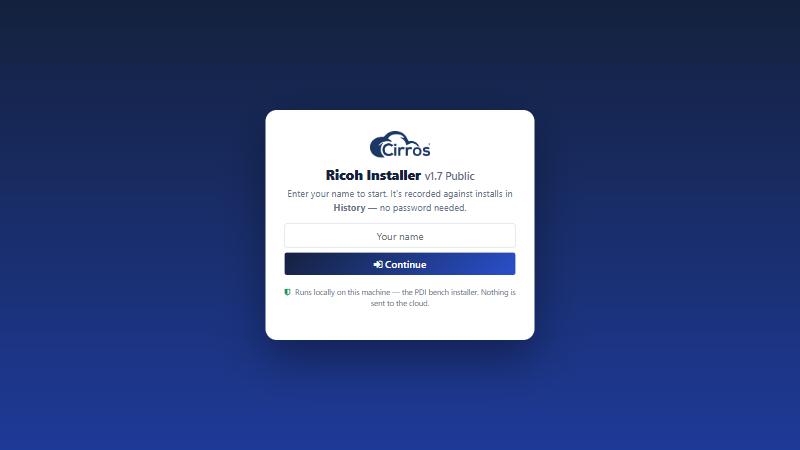
Enter your name and click Continue. There’s no password — the name is simply recorded against the installs you perform (useful in the History/Reports).
Adding devices
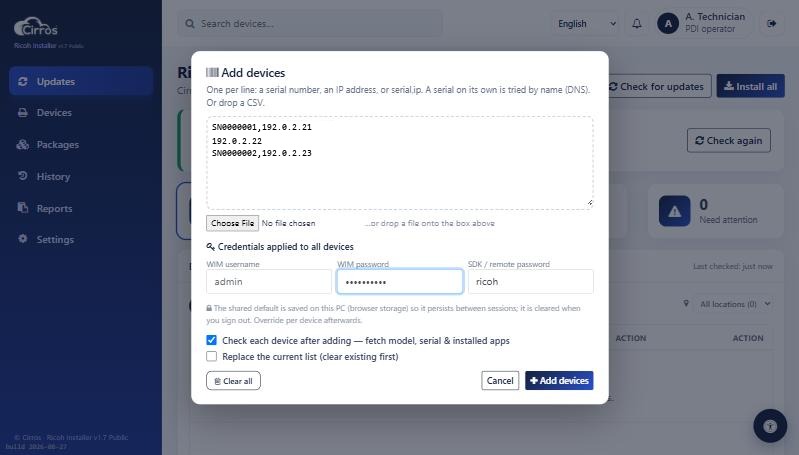
- Click Add devices.
- Paste your devices — one per line, either just the IP address or
serial,ip(e.g.SN0000001,192.0.2.21). You can also drop in a file. - Set the WIM username, WIM password and SDK / remote password — these apply to every device you’re adding (you can override per device later).
- Click Add devices. They appear in the list.
Where credentials live. The shared WIM and SDK/remote defaults you set here are saved to this browser’s local storage on the PC (base64-encoded — that’s encoding, not encryption) so “set once” survives a relaunch; they’re cleared when you sign out or reset the device list. Per-device overrides are held in memory for the session only. On a shared bench PC, sign out when you’re done. If devices use different passwords, add them in batches or set per-device credentials afterwards.
The list checks itself as you add
As soon as devices are added, the installer checks each one automatically and fills the list in — first whether it is reachable plus its model and serial number, then the installed Cirros apps. The device list becomes a readiness board: at a glance you can see that each device is on the network, is the one you expected (by serial), and where it stands on Cirros — without clicking Check on every row.
- Unreachable devices show Offline straight away.
- No password set yet? The device still gets an online / offline reachability result; its model, serial and installed apps fill in once its credentials are set.
- Re-adding a device re-checks it — paste it in again to refresh a row’s status at any time.
Prefer to add without checking? Untick Check each device after adding in the Add-devices dialog. The choice is remembered between sessions — so if the list ever stops checking on add, that toggle is the first thing to look at.
Getting the applications
The build ships with the current public Cirros suite (1.0.27: Authentication, Launcher, Copy, Print, Scan), so you can install straight away. To pull updated packages instead, add an ownCloud source under Settings → Application sources and click Sync.
- Load bundled suite (Packages page) — loads the packages shipped inside this build.
- Sync now — pulls the latest packages from your configured ownCloud location(s).
- Target version shown top-right reflects the packages currently loaded — e.g. “Cirros 1.0.27 is ready to install”. This build keeps that in step with what’s actually available, so you always install the version you expect.
Your package list is remembered — and self-healing. The packages you’ve loaded persist between sessions and are reconciled against what’s on disk each time the tool starts. If a remembered package has been superseded, the installer quietly substitutes the matching version from the bundled suite rather than leaving a gap — so an app you loaded earlier never silently goes missing.
Removing competitor software (Inepro, etc.)
Before Cirros goes on, the device usually needs the previous print-management system removed — for example Inepro, or a legacy Cirros/DocuPRO suite. The installer handles this two ways.
Automatically, as part of an install
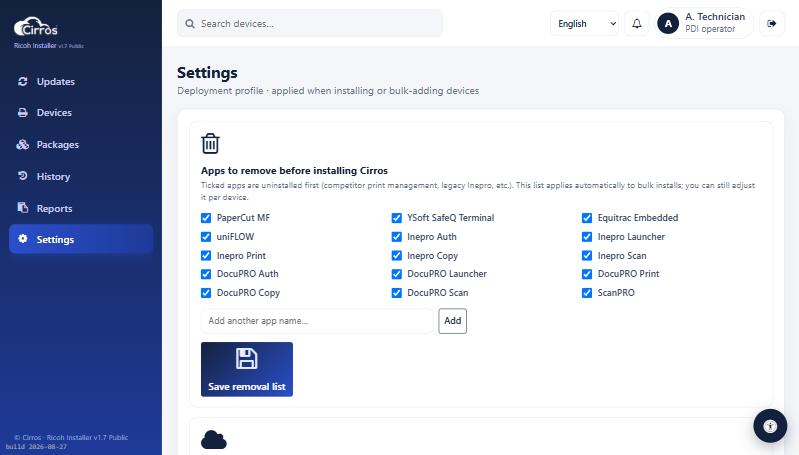
Under Settings → Apps to remove before installing Cirros there’s a list of competitor applications (Inepro print management, legacy suites, and so on). Any app on this list that is found on a device is uninstalled first, before the Cirros apps go on — that’s the “remove old → install” step at the top of a run. Tick/untick entries, or type another app name to add it to the list. It applies to every bulk install and can be adjusted per device.
On demand
You can also clean a device without a full install — right-click a device (or a selection):
- Remove competitor apps + reboot (live) — finds and removes the competitor print-management apps on the device (matched against the list above), then reboots. Use it to recover a device where an old suite is still in place.
- Remove card reader + reboot (live) — removes the card-reader plugin (see the next section).
Software vs. reader. The Inepro reader plugin is separate from the Inepro print-management apps — “Remove competitor apps” clears the software; “Remove card reader” clears the reader plugin.
Card readers
A Cirros install can configure the card reader so users badge in at the MFD. Card setup writes the reader’s USB plugin and its vendor/product ID (VID/PID) to the device — those IDs are what let the MFD bind the physical reader. Getting them wrong is the usual reason a panel reports the reader as “not connected”.
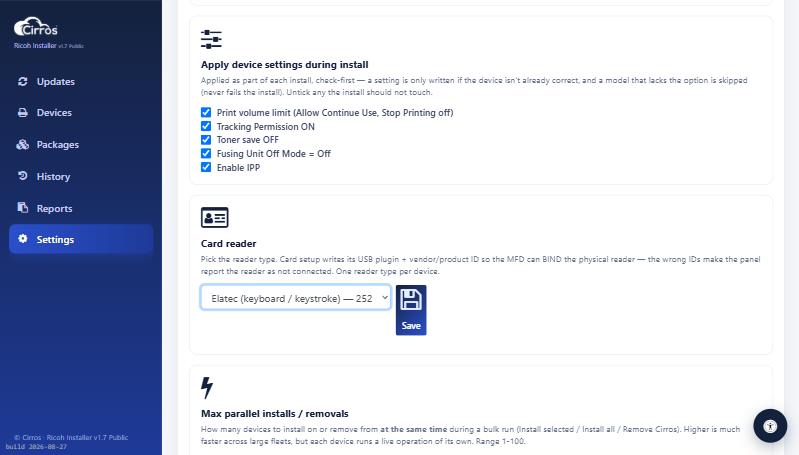
- Go to Settings → Card reader and pick the reader type:
- Elatec — keystroke plugin (VID/PID
0x09D8/0x0410). - Inepro (RIDP) — the Inepro reader plugin.
- Custom — enter the plugin name and VID/PID yourself.
- None — skip card setup entirely.
- Elatec — keystroke plugin (VID/PID
- Run an install (or the standalone card action). If a reader type is selected, a card-setup step runs as part of the install; if None is selected it is skipped.
“Reader not connected” at the panel? The stored VID/PID doesn’t match the physical reader. Pick the correct reader type (or enter the right IDs under Custom) and re-run card setup — right-click the device → Verify card reader to check what’s stored.
To remove a reader plugin (e.g. swapping an Inepro reader out), right-click the device → Remove card reader + reboot (live). A normal Cirros install keeps the reader, so you only need this when replacing it.
Inepro readers — the plugin isn’t in the build. The build ships only the five Cirros apps, not the Inepro/RIDP reader plugin. If a device already has the Inepro reader plugin, pick Inepro (RIDP) and the install keeps and configures it. To install the Inepro reader plugin from scratch, send the Inepro reader plugin to Cirros — we’ll host it on an ownCloud link that you add under Settings → Application sources, then Sync, and it installs and configures as part of the run.
Installing Cirros
- Tick the devices you want (or use Select all), then click Install (single device) or Install all.
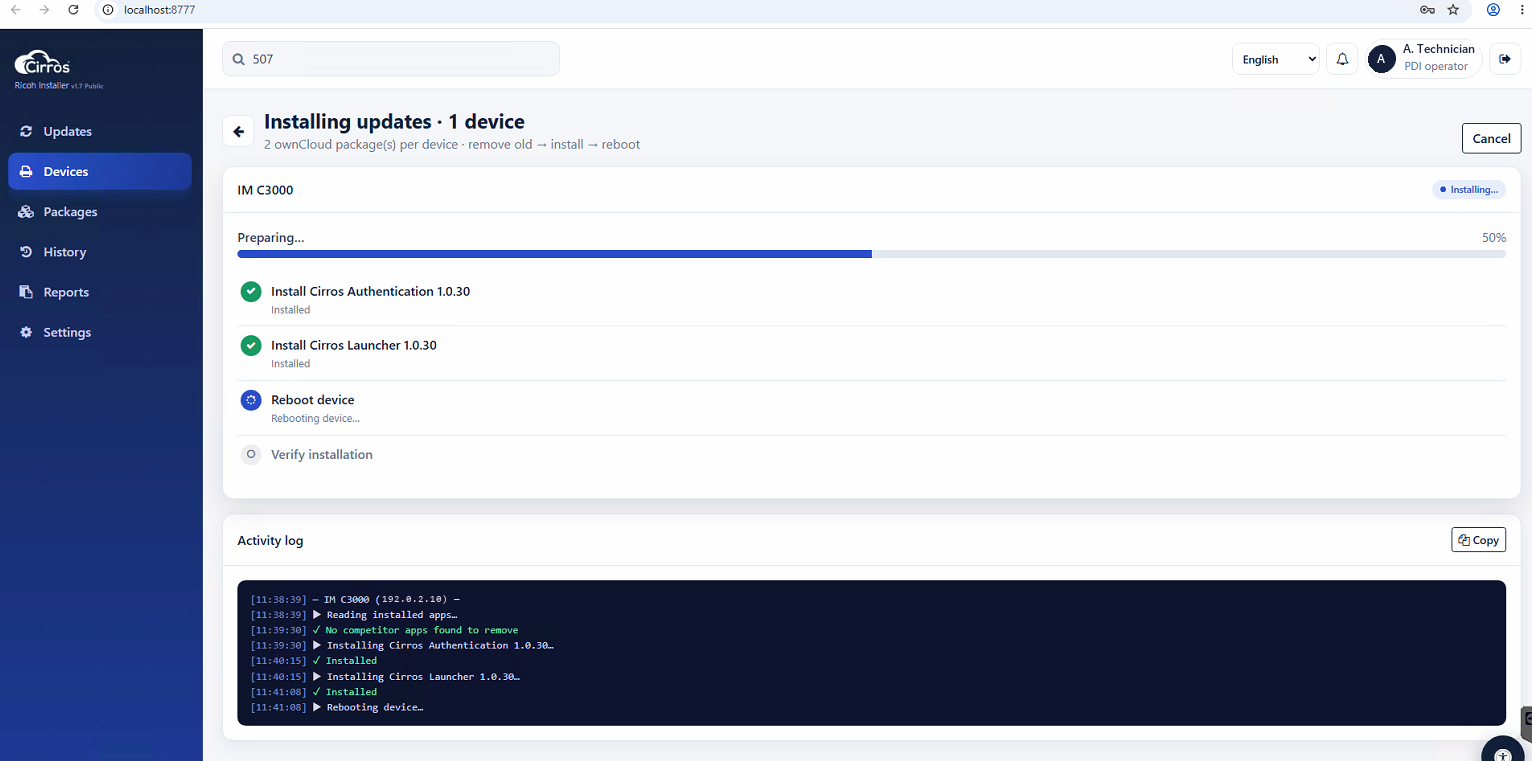
- Confirm the plan. The installer then runs, per device: remove competitor apps → prepare authentication → install the 5 apps → set SDK-certification service modes → reboots → enable Custom auth → configure the card reader → reboot → verify → apply device settings (including IPP) → print a health certificate.
- Watch progress in the panel. Reboots take a few minutes each and are confirmed automatically.
Piloting a bulk run. When you install on more than one device, the plan dialog offers “Test on one device first, then confirm before the rest” (on by default) with a picker for the pilot device. The installer provisions that one, pauses, and asks before rolling out to the rest — if the pilot fails, the others are left untouched. Devices already on the latest version are skipped unless you tick “Reinstall apps even if the device already has the latest version”.
A full install takes several minutes per device because of the reboots. That’s expected. If you move to the Devices or Packages page while a run is going, a Return to install progress link appears in the header, and the summary shows “Installing on N device(s)…” with a View progress button — either jumps you straight back to the live run.
A slow device won’t fail a good install. The largest app (the ~9 MB Launcher) can take a while to land, and a busy or older device sometimes accepts a package but is slow to send its response back — which used to surface as a Read timed out error even though the app had installed. The installer now re-reads the device’s app list when a step times out and, if the app is actually present at the expected version, marks the step verified after timeout and carries on.
After a bulk run, check Reports. The Reports page lists each run, failures first, with the step each device failed at, the reason, and a What to do note — plus CSV export and a Retry failed button that re-runs only the devices that didn’t succeed. History logs every action (time, operator, device, result) — the who-did-what record the sign-in name feeds.
Updating a single app
You don’t pick one app to push — you load the newer version of that app, then run Install, and the tool updates only what changed. It always installs the highest version it has of each app and skips any app already at that version, so a “just the Launcher” update really does just the Launcher.
- Load the new version (Packages page): add the ownCloud link that has it under Settings → Application sources and Sync now, or drop the package in and Load bundled suite. The Target version top-right updates to match. (The build ships 1.0.27, so a newer single app needs its package supplying via ownCloud.)
- The device row flips to Update Cirros / Update available.
- Right-click the device → Install Cirros (or tick it and Install). Leave “Reinstall apps even if the device already has the latest version” unticked — ticking it re-pushes all five.
- Only the app with the newer version installs; the rest are detected up to date and skipped.
Updates are a lean, fast run. On a device that’s already set up, an update or reinstall just installs the changed app(s) and reboots once — it doesn’t redo the provisioning (Administrator Authentication, the SDK-certification SP, the SP servlet and the extra reboots), the card setup, the device settings or the certificate, because those are already in place and persist. A fresh device still gets the full provisioning.
Device settings applied during install
Under Settings → Apply device settings during install you choose which settings each install applies. They’re check-first — a setting is only written if the device isn’t already correct, and a model that doesn’t have the option is skipped (it never fails the install). All are on by default.
- Print volume limit (Allow Continue Use, Stop Printing off)
- Tracking Permission ON
- Toner save OFF
- Fusing Unit Off Mode = Off
- Enable IPP
The “apply during install” checklist (Settings → Apply device settings during install).
| Setting | What it does |
|---|---|
| Print volume limit | Machine action = Allow Continue Use, Stop Printing off — so the device keeps working. |
| Tracking Permission | Turns on print-volume tracking — required for the Cirros dashboard to log usage. |
| Toner save OFF | Disables PCL/PS/PDF toner-save so print quality is full. |
| Fusing Unit Off Mode | Turns off the fuser energy-saver off-mode. |
| Enable IPP | Enables the IPP print protocol. |
Verifying an install
Every install ends by verifying the device and printing a health certificate on the MFD as a delivery record. You can also re-check any device at any time:
- Right-click a device → Verify install (full check) — confirms the apps, the SP modes and the device settings, and shows an “X of Y checks passing” summary.
- Right-click → Read installed apps or Verify card reader — inspect what’s on the device.
A healthy device reads 5/5: Administrator Authentication (all 4) ON · User Authentication = Custom · Print Volume = Allow Continue Use · Tracking Permission ON · Toner Saving OFF.
Uninstalling Cirros
- Right-click the device (or select several) → Uninstall all Cirros (live).
- Confirm. The tool reads the installed apps, removes them in the correct order, resets User Authentication to Off, and reboots.
Clean removal. Resetting User Authentication is important — it prevents the device being left in a state that would block a future re-install. The tool does this automatically.
Standalone actions
Right-click a device (or a selection) for on-demand actions without a full install/uninstall:
- Install Cirros
- Uninstall all Cirros (live)
- Remove competitor apps + reboot
- Remove card reader + reboot
- Verify install (full check)
- Reboot device
The right-click device menu (shown for a Ricoh device, 192.0.2.21).
- Enable IPP, Toner save OFF, Print volume limit, Tracking Permission ON, Fusing Off Mode — apply a single device setting.
- Reboot device, Check this device, Test connection, Read installed apps, Verify card reader.
- Remove competitor apps, Remove card reader — targeted clean-ups.
- Re-apply SDK login SP (live) — re-arms the SDK-certification SP and reboots; use it when a device’s login / SDK activation is lost. (A blank home screen needs a full re-install, not this.)
- Uninstall apps (live)… removes selected apps only, as opposed to Uninstall all Cirros.
- Verify SP modes, Install latest package and Open Web Image Monitor round out the menu.
Troubleshooting
| Symptom | Cause & fix |
|---|---|
| “Device not reachable” | The PC can’t reach the device. Check Test-NetConnection <ip> -Port 443 (run it in PowerShell, not Command Prompt); confirm the IP, that the device is on, and that no firewall/VLAN blocks the path. Run from a machine on the printer network. |
| “Failed to fetch” in the browser | The installer window was closed or restarted, so the browser tab is talking to a service that isn’t there. Re-launch CirrosRicohInstaller.exe and/or reload the browser tab, then retry. |
| Card reader “not connected” | The stored VID/PID doesn’t match the physical reader. Pick the correct reader type in Settings (or enter the IDs under Custom) and re-run card setup; use Verify card reader to check. |
| Wrong / old version offered | A stale package list. Go to Packages → Load bundled suite, then reload the page. (This build also self-corrects on reload.) |
| “Power-cycle <device> now” prompt | The installer needs the device rebooted by hand — either because the latest Ricoh IM models ignore a remote reboot, or because a reboot couldn’t be auto-confirmed over the network (some models don’t drop their web port during a reboot). Switch the MFD fully off and on at the mains, wait until the panel is completely back at its home screen, then click “Device is back — continue”. The run resumes from where it paused. (A reboot issued but not auto-confirmed shows amber, not red — it’s expected on the latest models.) |
| A step reports Read timed out (usually the Launcher) | A slower/older device accepted the package but was slow to send its response back. Usually nothing to do — the installer re-reads the device and, if the app is present at the right version, marks it verified after timeout and continues. Only if it reports the app genuinely missing, re-run the install on that device. |
| “Device SDK not responding” / apps won’t list | The device answers on the web but its SDK-J / Extended-Feature platform is wedged — common just after an SP-servlet, IPP or volume change that restarts the web service. The installer first tries a full panel + controller reboot to clear it. If it still can’t read the apps, use the tool’s Reboot device action — not the mains switch: a mains power-cycle alone does not restart a wedged Smart Operation Panel. Wait 2–3 minutes for it to finish booting, then retry. |
| A device won’t take the SP write (“system busy” / “not supported in this version”, even though SP reads work) | Almost always an orphaned Custom Authentication — User Authentication was left set to Custom with no Cirros app behind it, which jams the SP subsystem so every SP write is refused. Easiest fix: run a full Uninstall → Reinstall through the tool — it clears the auth state in the correct order. By hand in Web Image Monitor (logged in as administrator): Configuration → Device Settings → User Authentication Management → set to Off; then set SP 5401-230 bit 0 = 1 and SP 5490-001 = 1 and reinstall — the reinstall re-establishes Custom auth on its own. If the SP write still fails once User Auth is Off, it is no longer the auth wedge — note the model and exact error and escalate to Ricoh. |
| An install step warns but the run continues | The device settings are best-effort — a model that lacks an option is skipped and warned, never failing the Cirros install. |
| Lots of text in the console window | Normal service logging. Keep the window open; you don’t need to read it. |
Sending a problem to Cirros support? On the Settings page, under Support, click Download logs — it saves cirros-installer-logs.zip (the per-operation and device-engine traces from this session; no passwords are included). Send that to Cirros support along with the device IP and serial and a line on what you saw. It’s written locally on the PC — nothing is sent anywhere automatically.
Stopping the tool
When you’re finished, close the console window to stop the installer service. You can re-launch it any time by double-clicking CirrosRicohInstaller.exe again.