
GovPrint user guide
The GovPrint user guide (Quick Guide v1.2): how to register, link your card, and print, copy and scan with GovPrint.
Introduction
What is GovPrint?
GovPrint is a shared printing solution providing print, copy and scan services.
A shared service promotes interoperability across organisations, and reduces the number of printers, leading to cost savings and a positive environmental impact.
The printers, often called MFDs (Multi-Functional Devices) allow users to print, copy, scan to email from any GovPrint printer across the entire Civil Service estate.
GovPrint is managed and delivered by the Government Property Agency (GPA). The GPA oversees the entire procurement and management process, ensuring departments only pay for what they use.
You can identify GovPrint printers by a label with the GovPrint logo they are marked with.
To use the service you will need to:
- Register for the service (Registering for GovPrint) and,
- Link your GovPass or building card (Linking Your GovPass or Building ID Card).
Support
For help with GovPrint including faults with printers you should contact your departmental Service Desk.
Registering for GovPrint
Before you can use GovPrint printers, you must register your email with the GovPrint service.
You only need to register for GovPrint once, however, your registration will expire after six months if you do not use GovPrint during that time. If this happens, you can register again.
To register for GovPrint:
- Open any document you want to print
- Go to the print menu in your application and select Send to GovPrint as your printer Note: you can set other printer options, such as number of copies and paper size, later in the process.
- Click Print
- A Cirros login pop-up is displayed
- Enter your email address, then click Next
- Check your email inbox, you will have received an email from noreply@mycirros.net which will contain your GovPrint Passcode. You will need to make a note of your GovPrint Passcode to register your GovPass / Building ID card at the printer at a later step.
- Enter your GovPrint Passcode, then click Next
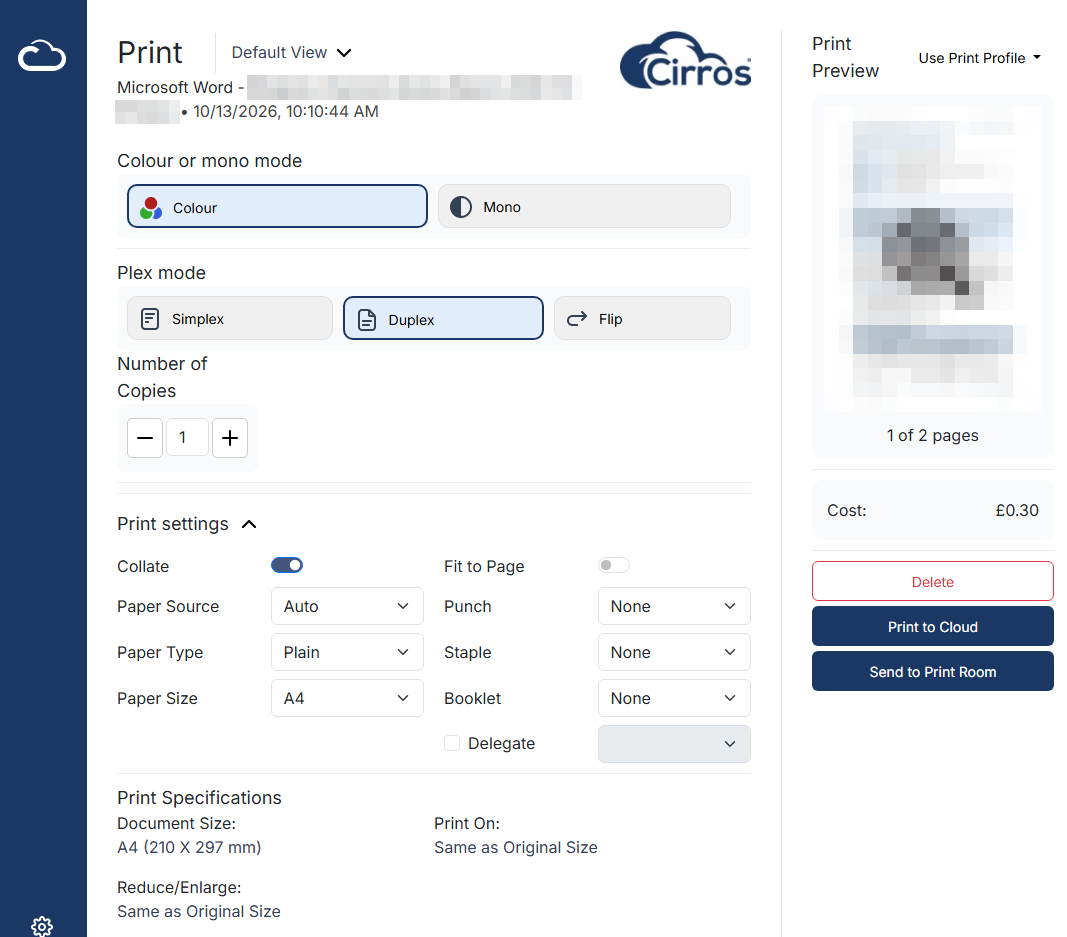
- Set your print preferences and click on Print to Cloud to submit your print job
- You are now registered with GovPrint
Alternatively you can:
- Open the GovPrint cloud portal in your browser: https://dashboard.cirrossl.net/
- Click Login
- Enter your email address, then click Next
- Enter your first and last name, then click Next
- Check your email inbox, you will have received an email from noreply@mycirros.net which will contain your GovPrint Passcode. You will need to make a note of your GovPrint Passcode to register your GovPass / Building ID card at the printer at a later step.
- Enter the GovPrint Passcode, then click Next
- You are now registered with GovPrint
Please note. If you register for GovPrint via the GovPrint cloud portal you will be asked to enter your email address and GovPrint Passcode the first time you send a print job to the service.
Linking Your GovPass or Building ID Card
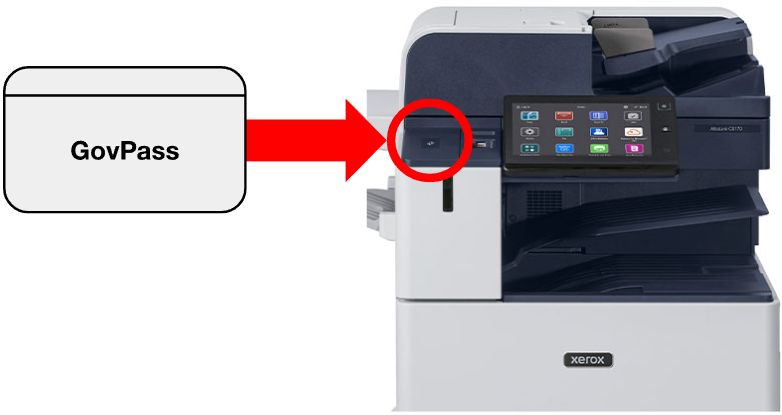
Before linking your GovPass or Building card, you must ensure that you have first registered with the GovPrint service (Registering for GovPrint).
- Go to any GovPrint printer and tap your GovPass / building ID card on the card reader, located to the left of the display screen.
- Enter your email address and the GovPrint Passcode you received during registration to link your card to your GovPrint account.
- Your GovPass or building ID card is now linked to your GovPrint account.
Printing from a Windows or Mac Device
Before printing to GovPrint you must register for the service (Registering for GovPrint) and link your GovPass or building card (Linking Your GovPass or Building ID Card).
Follow these steps to print a document from your Windows or Mac device. For other platforms, please refer to Cloud Printing with GovPrint.
Steps for Windows Users
- Open the document you want to print
- Go to the print menu in your application and select Send to GovPrint as your printer Note: you can set other printer options, such as number of copies and paper size, later in the process.
- Click Print
- The Cirros print dialog screen will be displayed. Set your desired print preferences and click Print to CLOUD
- The document is now queued for printing, and can be collected from any GovPrint printer
Advanced Options for Windows Users
- Direct Submission - you can suppress the Cirros print dialog screen by enabling Direct Submission. Right click on the Cirros icon in the System Tray and click on Enable Direct Submission. When enabled the default print job properties will be applied.
- File Explorer - you can submit documents to GovPrint from the context menu in File Explorer. Right click on a document and ‘Send to GovPrint’ will be an option in the context menu.
Steps for Mac Users
- Open the document you want to print
- Go to the print menu in your application and select Send to GovPrint as your printer Note: you can set other printer options, such as number of copies and paper size, later in the process.
- Click Print
- The Cirros screen will be displayed. Set your desired print preferences and click Print to CLOUD
- The document is queued for printing, and can be collected from any GovPrint printer
Collecting your document from a GovPrint printer
- Go to any GovPrint printer and tap your GovPass or building ID card on the card reader, located to the left of the display screen, or log in with your email address and GovPrint Passcode
- Press the Print button on the touchscreen
- Select your document(s) from the displayed list
- Press the green Print button
- Your document(s) will be printed, please remember to collect your printed documents
Please note. If the document is not printed please check whether the device has run out of paper or has any other error, to do this:
- Press the Xerox button on the touchscreen
- Press the Jobs button on the touchscreen
- Any jobs that are not complete will be listed as Held: Resources Required
- Press the relevant print job
- If required add paper to the paper tray of the device or to delete the job press the red Delete button
Deleting a print job
Print jobs you have sent to GovPrint will automatically be deleted after 72 hours if you do not release them at a printer.
If you need to delete a print before they are automatically deleted:
- Go to any GovPrint printer and tap your GovPass or building ID card on the card reader, located to the left of the display screen, or log in with your email address and GovPrint Passcode
- Press the Print button on the touchscreen
- Select your document(s) from the displayed list
- Press the red Delete button
If you need to delete a print job after you have released the document, for example, if the device has a fault:
- At the device where you are printing the document
- Press the Xerox button on the touchscreen
- Press Jobs button on the touchscreen
- Select your document(s) from the displayed list
- Press the red Delete button
Cloud Printing with GovPrint
Before printing to GovPrint you must register for the service (Registering for GovPrint) and link your GovPass or building card (Linking Your GovPass or Building ID Card).
Cloud printing allows you to print to any GovPrint printer across the Civil Service estate from any device.
To use the Cloud Printing feature, you must first register for the GovPrint service.
Steps for printing via the GovPrint cloud portal
- Open the GovPrint cloud portal in your browser: https://uk-print1.cirrossl.net/Home/Welcome
- Click Login
- Enter your email and GovPrint Passcode, then click Log in
- The upload page is displayed
- Click anywhere in the window to open an upload dialog
- Select the documents you want to print in the upload dialog
- Click Upload
- The Cirros print dialog screen is displayed
- Select the options required, then click Print to Cloud
- The document or documents are now queued for printing
Collecting your document from a GovPrint printer
- Go to any GovPrint printer and tap your GovPass or building ID card on the card reader, located to the left of the display screen, or log in with your email address and GovPrint Passcode
- Press the Print button on the touchscreen
- Select your document(s) from the displayed print queue, and press the green Print button
Your document(s) will be printed.
Guest Printing with GovPrint
Unregistered guest users can print via the GovPrint cloud portal or email. After submission, they receive a Job Code which any registered user can use to release the documents on their behalf.
Steps for guest printing via the GovPrint cloud portal
- Open the GovPrint cloud portal in your browser: https://uk-print1.cirrossl.net/Home/Welcome
- Click Anonymous User
- The upload page is displayed
- Click anywhere in the window to open an upload dialog
- Select the documents you want to print in the upload dialog
- Click Upload
- The Cirros print dialog screen is displayed
- Select the options required, then click Print to Cloud
- Make a note of the Job Code that is displayed, then click OK. You need the Job Code at the printer, and it cannot be retrieved later.
- The document or documents are now queued for printing
Collecting your document from a GovPrint printer
- Ask any registered user to go to any GovPrint printer and tap their GovPass or building ID card on the card reader, located to the left of the display screen, or log in with their email address and GovPrint Passcode
- Press the Print button on the touchscreen
- Select the ‘Guest’ print button and enter the Job Code
- Select document(s) from the displayed print queue, and press the green Print button
Your document(s) will be printed.
Scanning with GovPrint
Before scanning with GovPrint you must register for the service (Registering for GovPrint) and link your GovPass or building card (Linking Your GovPass or Building Card).
By following these steps, you can scan documents and have them delivered directly to your email using any GovPrint printer.
Steps for Scanning
- Go to any GovPrint printer and tap your GovPass or building card on the card reader, located to the left of the display screen, or log in with your email address and GovPrint Passcode
- Place the documents you wish to scan into the feeder or on the scanner bed, ensuring they are correctly aligned
- On the printer’s touchscreen, press the Scan button to access scanning options
- Choose your preferred scan settings, such as the resolution and file format
- Press the green Scan button to begin scanning your documents.
- Your scanned documents will be automatically sent to your registered work email address
- The email you receive will either have the scanned document included as an attachment OR for larger documents, a link to download the scanned document
Please note. Some departments require users to enter a one-time password to allow download of the scanned document, this will be sent in a separate email to your registered work email address.
Photocopying with GovPrint
Before photocopying with GovPrint you must register for the service (Registering for GovPrint) and link your GovPass or building card (Linking Your GovPass or Building ID Card).
Steps for Photocopying
- Go to any GovPrint printer and tap your GovPass or building ID card on the card reader, located to the left of the display screen, or log in with your email address and GovPrint Passcode.
- Place the documents you wish to photocopy into the feeder or on the scanner bed, making sure they are properly aligned.
- On the printer’s touchscreen, press the Photocopy button to access the photocopying options
- Choose your desired photocopy settings, such as number of copies, paper size, and color options
- Press the green Copy button to begin the photocopy process.
Forgotten GovPrint Passcode
You can request a new GovPrint Passcode if you have forgotten it.
- Open the GovPrint cloud portal in your browser: https://dashboard.cirrossl.net/
- Click Login
- Enter your email address, then click Next
- Click Forgot Password
- Check that the displayed email is correct and Send Reset Link
- Check your email inbox, you will have received an email from noreply@mycirros.net which will contain your new GovPrint Passcode
Registering a New Building Card
To register your new building pass you will need your:
- Email address
- GovPrint Passcode - If you have forgotten your GovPrint Passcode follow the steps in section Forgotten GovPrint Passcode
Steps to register your new building card
- Go to any GovPrint printer and tap your GovPass / building ID card on the card reader, located to the left of the display screen.
- Enter your email address and the GovPrint Passcode you received during registration to link your card to your GovPrint account.
- Your GovPass or building ID card is now linked to your GovPrint account.